New Tail Light Housings
-
Jim Golden
- Posts: 17
- Joined: Sun Oct 09, 2016 1:39 pm
New Tail Light Housings
Hi Gang,
My OEM tail light housings on the 34X were pretty sad. Decided to make some new ones. I never did like the chintzy plastic ones. Proper ones should be aluminum!
So got some .040" thick 6061 aluminum. I mocked up what they should be in cardboard. This was harder than it sounds, as the coaches taper in two planes in this area. But I got it worked out. Then drew it up in AutoCAD.
I laid it out like a flower, where the center part that had the three holes for the lights (went for a Corvette look with three round lenses) was the middle, and it then had four "petals" around it to form the left side, right side, top, and bottom. You cut the whole thing out, then bend the four petals 90 degrees and you have a housing.
We converted the AutoCAD file into G-Code and then into something else that the metal shop's CNC machine would use. We cut them out with their plasma burner, which I found to be much more accurate than if I tried to do it with tin snips. The burner also cut out the round holes for the LED lights.
All my lights came from www.superbrightleds.com I also replaced all the running lights so that I don't look like The Beverly Hillbillies anymore going down the road with half the lights out.
OK, so I got my housings cut out and folded. We made angle from bending aluminum sheet in a brake. I then drilled, and used round headed AN rivets to rivet the corners together using the angle pieces I'd made, placed inside the corners of the housings. The AN rivets made it match the rest of the trailer. I made small pieces of angle that I riveted to the housings on the inside back side, and then screwed through these into the coach's skin using stainless steel sheet metal screws. The stainless is closer to aluminum on the Periodic Chart and thus reduces galvanic corrosion. In four years, I've seen none.
I wired the lights up so that both red's on each side flash, and and serve as brake lights/running lights. The backup lights are actually a lot better than the OEM ones...though I'm not sure how much good backup lights do you when the rig is 58' long (my 4-door Dodge is long on top of the Long Long Trailer).
I had most of the wiring done up ahead of time. So the plugs were done. Stick the harnesses into the housings, attach the housings to the skin. Then plug the harnesses to the LED round lights, and then attach the lights into the housings.
My attempt at a "Corvette Look" ended up a little more like "Mid 1930's German Industrial" so it looks more like it came out of the Messerschmidt factory than the Corvette plant, but I still like it. They work great, look great, and I've gotten many compliments. I've also never seen another one on the road that matches it...although Silver Streak did have a light that looked a lot like this, only rotated 90 degrees.
See ya on the road,
Jim

Re: New Tail Light Housings
BTW, what is an AN rivet and what's the benefit compared to other rivets?
KYAvion
1984 Avion 30R
1984 Avion 30R
-
Jim Golden
- Posts: 17
- Joined: Sun Oct 09, 2016 1:39 pm
Re: New Tail Light Housings
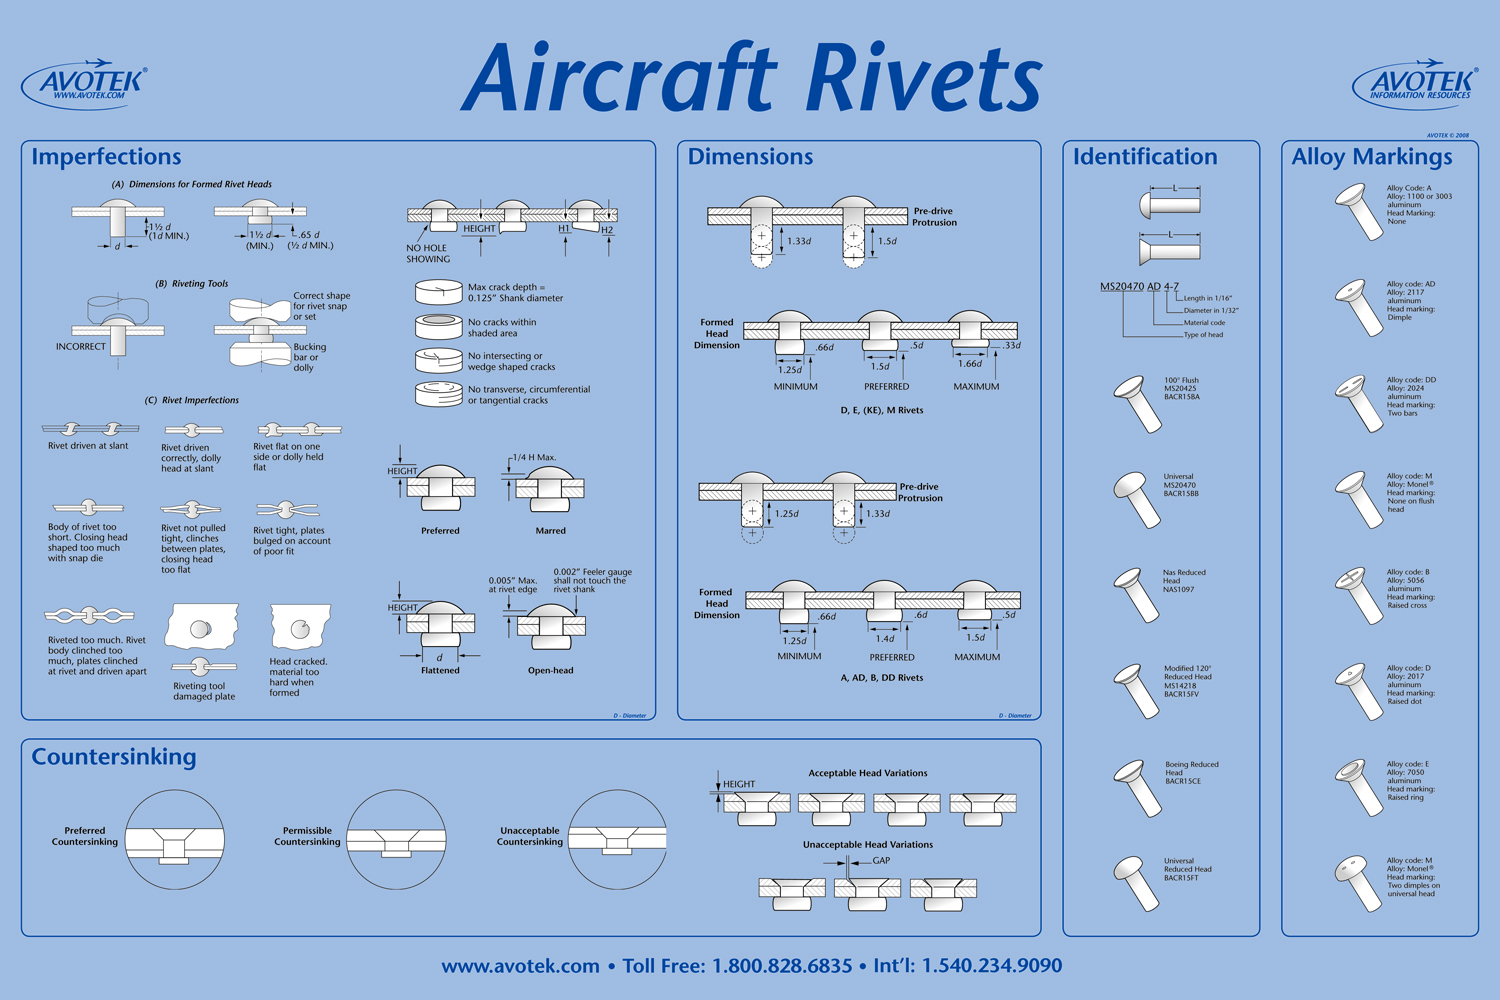
I think AN just means its an exposed round headed rivet, as opposed to a flush rivet. But, it might be a misnomer as AN usually refers to "Army/Navy" and you'll see it used for all kinds of parts. So it may be like "Kleenex" where it's applied generically to most tissues and they call AN rivets on any exposed round headed rivet. I'd have to do a little research on it.
https://www.avotek.com/wp-content/uploa ... Rivets.jpg
This might help
But anyway, our trailers use the round headed AN style rivets. I believe they are 3/16" but it's been a while since I made these. They're "driven" solid rivets where you drive the head with a rivet gun and use a bucking bar on the backside to mushroom it. Pretty easy to learn once you practice a little.
I still have the files for the CNC if anybody wanted to make some.
Take care,
Jim